In this HOWTO, we expand upon the simple Elasticsearch proxy we deployed in our first Lambda tutorial.
In that tutorial, we showed you how to create a proxy in front of the AWS Elasticsearch service using a Lambda function and an API Gateway. We used Identity and Access Management (IAM) policies to sign and encrypt the communication between your Lambda function and the Elasticsearch service.
This HOWTO builds upon that simple use case. In this HOWTO, we extend the API gateway to proxy user requests to the downstream Elasticsearch Application Programming Interface (API).
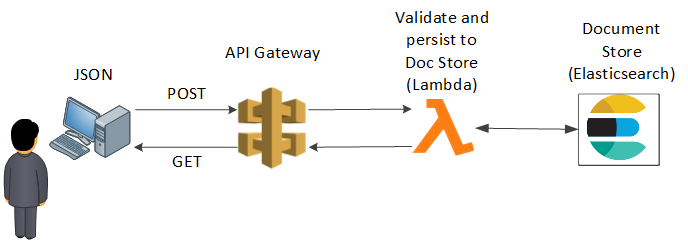
A user POSTS a JSON encoded Elasticsearch Document to our API gateway. The API gateway then validates the JSON against an authoritative schema, and if the Document passes, the API gateway will send the Document to our document store over an encrypted channel.
The API gateway blocks all other access to our Elasticsearch services' indices, methods and endpoints.
The Agenda for this HOWTO follows
- Create and configure your AWS development environment
- Deploy and configure an AWS Elasticsearch endpoint using the AWS CLI
- Create an app that receives, validates and submits a Document to your Elasticsearch endpoint
- Use Chalice to deploy your Lambda function and create/ attach an API gateway
- Test drive your new Elasticsearch proxy
1. Create and configure your AWS development environment
In this HOWTO, we use the AWS Command Line Interface (CLI) to deploy Elasticsearch, Lambda, an API gateway, IAM roles and IAM policies. If you get lost, refer to the first tutorial, which goes into much more detail.
First create and activate a python virtual environment.
[~]$ virtualenv working
[~]$ cd working
[working]$ source ./bin/activate
Now, update PIP and install the awscli, boto, chalice, httpie and jsonschema packages.
(working)[working]$ pip install -U pip
(working)[working]$ pip install awscli boto chalice httpie jsonschema
Now, install your AWS credentials into your development environment. I show dummy credentials below. Be sure to use real credentials.
(working)[working]$ aws configure
AWS Access Key ID [None]: 4F4OJ5BO8YAZSMK75VT6
AWS Secret Access Key [None]: YVNXPN9S0D9GHTCZRC22V1KEP1MKLURVA81UYW4R
Default region name [None]: us-east-1
Default output format [None]:
2. Deploy and configure an AWS Elasticsearch endpoint using the AWS CLI
I use the AWS CLI below to deploy Elasticsearch. Again, if you get lost or prefer to use the AWS Console GUI, simply refer to the first Lambda tutorial.
The following AWS CLI command deploys an Elasticsearch domain, and attaches a security policy that only allows access from services owned by your AWS account. For debugging purposes, we also punch a hole in the policy in order to give you (the developer) access to the Kibana web GUI. For that reason, ensure that the policy below includes the IP address of whichever workstation you plan to access the GUI with.
To make life easy, export your AWS account ID and IP address to the following environment variables. Once more, I use dummy examples below. Be sure to use your actual AWS account ID and IP address.
(working)[working]$ export AWS_ARN_ID=012345678901
(working)[working]$ export MY_IP_ADDRESS=8.7.6.5
The following (hideous) command uses the two environment varables above to create an Elasticsearch domain (named elastic) specifically tailored for your personal environment. If you run into any difficulties, you can just deploy the Elasticsearch service using the AWS Console GUI.
(working)[working]$ aws es create-elasticsearch-domain --domain-name "elastic" --elasticsearch-version "6.0" --elasticsearch-cluster-config InstanceType="t2.small.elasticsearch",InstanceCount=1,DedicatedMasterEnabled=false,ZoneAwarenessEnabled=false --ebs-options EBSEnabled=true,VolumeType="gp2",VolumeSize=10 --access-policies "{\"Version\":\"2012-10-17\",\"Statement\":[{\"Effect\":\"Allow\",\"Principal\":{\"AWS\":\"arn:aws:iam::"$AWS_ARN_ID":root\"},\"Action\":\"es:*\",\"Resource\":\"arn:aws:es:us-east-1:"$AWS_ARN_ID":domain/elastic/*\"},{\"Sid\":\"\",\"Effect\":\"Allow\",\"Principal\":{\"AWS\":\"*\"},\"Action\":\"es:*\",\"Resource\":\"arn:aws:es:us-east-1:"$AWS_ARN_ID":domain/elastic/*\",\"Condition\":{\"IpAddress\":{\"aws:SourceIp\":[\""$MY_IP_ADDRESS"\"]}}}]}"
If it works, you will see output similar to the following:
{
    "DomainStatus": {
        "ElasticsearchClusterConfig": {
            "DedicatedMasterEnabled": false,
            "InstanceCount": 1,
            "ZoneAwarenessEnabled": false,
            "InstanceType": "t2.small.elasticsearch"
        },
        "DomainId": "012345678901/elastic",
        "Created": true,
        "Deleted": false,
        "EBSOptions": {
            "VolumeSize": 10,
            "VolumeType": "gp2",
            "EBSEnabled": true
        },
        "Processing": true,
        "DomainName": "elastic",
        "SnapshotOptions": {
            "AutomatedSnapshotStartHour": 0
        },
        "ElasticsearchVersion": "6.0",
        "AccessPolicies": "{\"Version\":\"2012-10-17\",\"Statement\":[{\"Effect\":\"Allow\",\"Principal\":{\"AWS\":\"arn:aws:iam::012345678901:root\"},\"Action\":\"es:*\",\"Resource\":\"arn:aws:es:us-east-1:012345678901:domain/elastic/*\"},{\"Sid\":\"\",\"Effect\":\"Allow\",\"Principal\":{\"AWS\":\"*\"},\"Action\":\"es:*\",\"Resource\":\"arn:aws:es:us-east-1:012345678901:domain/elastic/*\",\"Condition\":{\"IpAddress\":{\"aws:SourceIp\":\"8.7.6.5\"}}}]}",
        "AdvancedOptions": {
            "rest.action.multi.allow_explicit_index": "true"
        },
        "EncryptionAtRestOptions": {
            "Enabled": false
        },
        "ARN": "arn:aws:es:us-east-1:012345678901:domain/elastic"
    }
}
3. Create an app that receives, validates and submits a Document to your Elasticsearch endpoint
We use Chalice to create a Lambda function and attach it to an API gateway. I move through this pretty quickly, and again, take a look at our first Lambda tutorial if you get lost.
Ensure that you are in your Python working directory. Now, pull our example Chalice package from Github:
(working)[working]$ git clone https://github.com/hatdropper1977/eslambda.git
This pulls the source code for a working Chalice package. If you change directories and enter eslambda, you will find the following important components.
- app.py
- This contains the main Lambda application. The application validates a JSON Document, creates a random Document ID and then chucks the Document to our Elasticsearch document store. The application's structure should look familiar to those developers that have experience with Flask.
- chalicelib\config.py
- This module includes the configuration for your development environment. The Chalice documentation instructs you to include any additional Python files in the chalicelib directory. Be sure to update ELASTICSEARCH_ENDPOINT with your Elasticsearch endpoint's URL.
- requirements.txt
- Similar to Elastic Beanstalk , Chalice uses requirements.txt to ensure the Lambda function includes all the required packages. jsonschema, unfortunately, requires functools, which cannot be installed via pip. If you attempt to deploy your Chalice package using just requirements.txt, you will get the following error: Could not install dependencies: functools==3.2. You will have to build these yourself and vendor them in the chalice vendor folder. This brings us to the next bullet...
- vendor/functools32
- Pip will not find wheel files for functools, a dependency for jsonschema. To solve this problem, I followed the instructions on the official Chalice documentation and built a wheel file appropriate for Amazon Linux. I then unzipped it into the vendor directory. You're welcome.
- .chalice/policy-dev.json
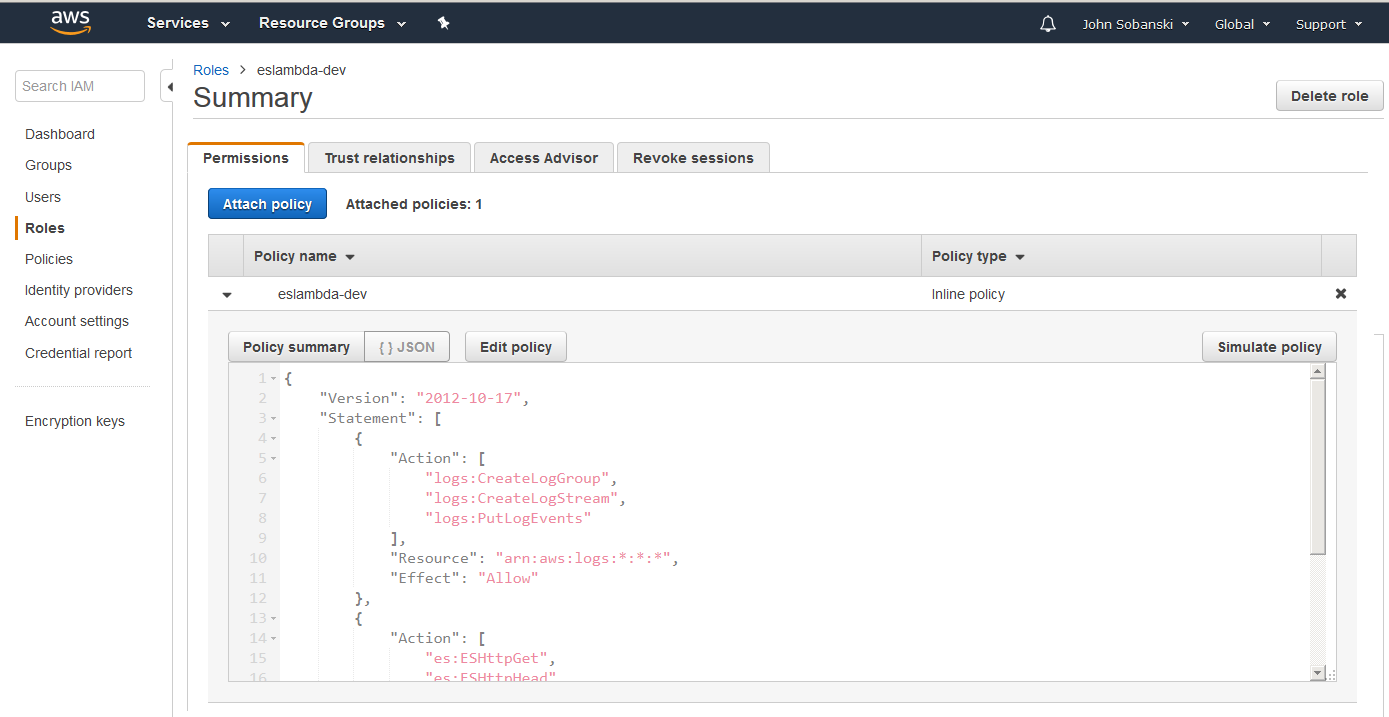
- This IAM policy allows your lambda function to execute GET, HEAD, POST and PUT on your Elasticsearch domain, and to log activity.
Before we move on, please make sure that you edited config.py to reflect your Elasticsearch endpoint. You can find this in the Elasticsearch console, under the elastic domain. Leave off https:// and the trailing slash.
4. Use Chalice to deploy your Lambda function and create/ attach an API gateway
If you are ready, execute the following command in order to deploy the Lambda function and API gateway:
(working)[working]$ cd eslambda
(working)[eslambda]$ chalice deploy --no-autogen-policy
Creating role: eslambda-dev
The following execution policy will be used:
{
  "Version": "2012-10-17",
  "Statement": [
    {
      "Action": [
        "logs:CreateLogGroup",
        "logs:CreateLogStream",
        "logs:PutLogEvents"
      ],
      "Resource": "arn:aws:logs:*:*:*",
      "Effect": "Allow"
    },
    {
      "Action": [
        "es:ESHttpGet",
        "es:ESHttpHead",
        "es:ESHttpPost",
        "es:ESHttpPut"
      ],
      "Resource": "*",
      "Effect": "Allow"
    }
  ]
}
Would you like to continue?  [Y/n]: Y
Creating deployment package.

Could not install dependencies:
functools32==3.2.3-2
You will have to build these yourself and vendor them in
the chalice vendor folder.

Your deployment will continue but may not work correctly
if missing dependencies are not present. For more information:
http://chalice.readthedocs.io/en/latest/topics/packaging.html

Creating lambda function: eslambda-dev
Initiating first time deployment.
Deploying to API Gateway stage: api
https://9z8cesjny0.execute-api.us-east-1.amazonaws.com/api/
Once you execute this command, Chalice should report an endpoint. If you would like, you can go to your AWS console and take a look at what Chalice deployed.
Chalice deploys a Lambda function:
Chalice deploys an API Gateway that reflects the logic you included in app.py:
Chalice also deploys an IAM Role and Policy for your Lambda Function:
5. Test drive your new Elasticsearch proxy
You can use httpie to test out your new API gateway. By default, httpie encodes POST data as Content-Type = application/json. The syntax below ensures we match the proper schema for bigsurvey. The colon equals syntax for agree and anumber ensures httpie sends a boolean value and numeric to the API gateway. You can experiment with changing these to strings, and you will observe the API gateway refuses the data.
(working)[eslambda]$ http POST <<YOUR API Gateway URL>> agree:=true anumber:=1 textblob='abc sdf' ipaddr='192.168.10.10'
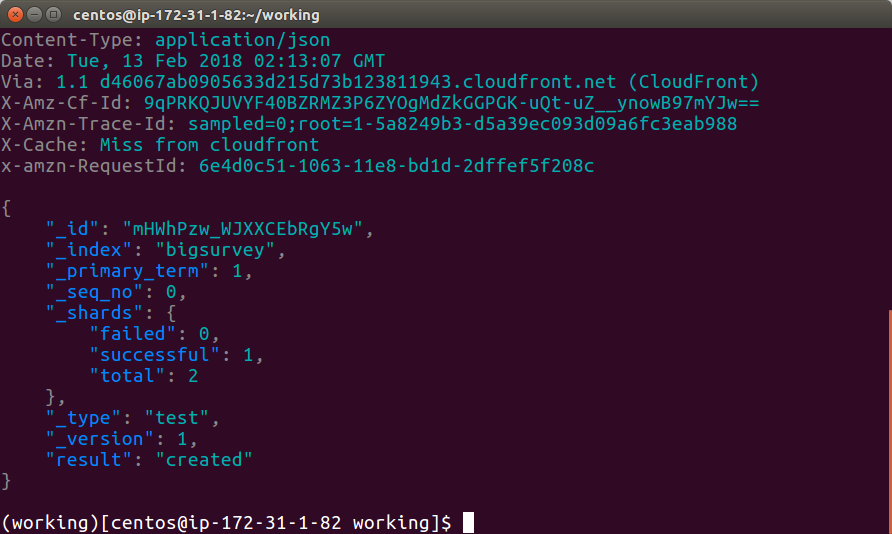
HTTPIE reports success:
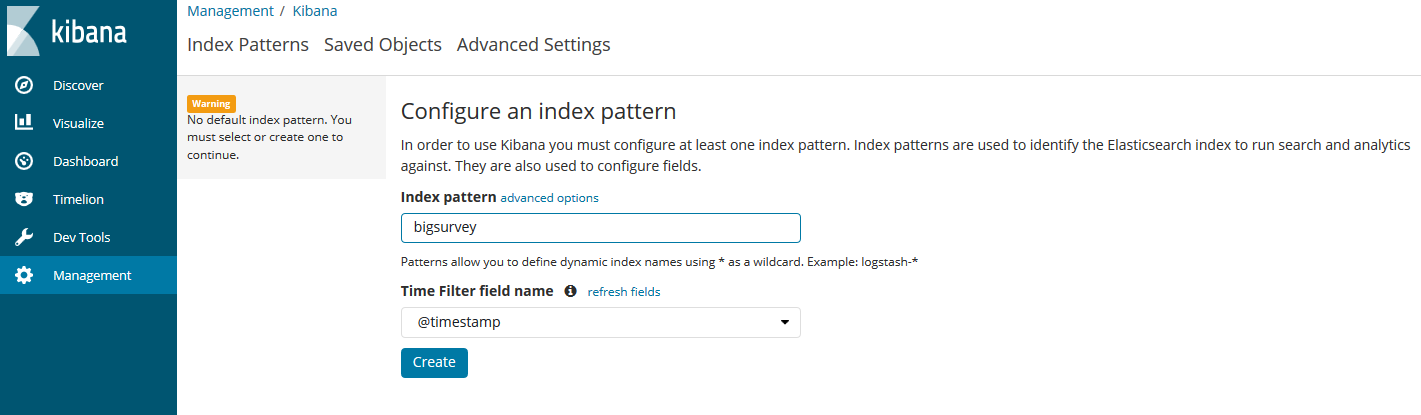
From your Kibana endpoint, go to Management --> Kibana --> Index Patterns.
Type in bigsurvey for your index pattern and @timestamp for the Time Filter Name. If you modified ELASTIC_INDEX_NAME in chalicelib\config.py, then input that name in index pattern.
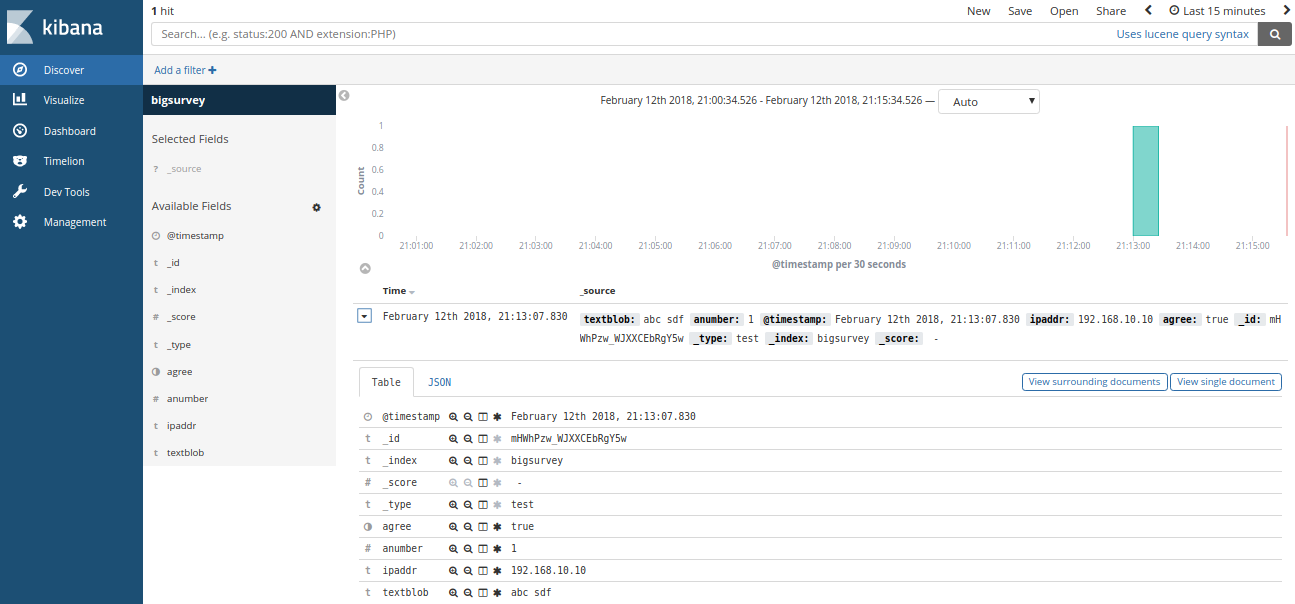
Now go to the Discover tab. You will see the Document that HTTPIE just posted to our API gateway.
Conclusion
Congrats! You used Chalice to deploy an Elasticsearch proxy that validates a JSON Document before it posts to a private Elasticsearch document store. You can easily extend my example to accomodate other user stories.