Introduction
OpenDaylight provides a Software Defined Network (SDN) controller that allows network engineers to programmatically direct network services via a Representational state transfer (REST) Application Programming Interface (API).

When I played around with OpenDaylight a bit a couple of years back, I came from a Systems/ Network engineering background. I found the required Java domain experience a bit frustrating. I put together this blog post, therefore, to make the valuable OpenDaylight platform more accessible to Systems/ Network Engineers.
The following bulleted list records the layout of this blog post.
Options
- Install OpenDaylight release from zip
- Build the current OpenDaylight Release from Git source
- Build a previous OpenDaylight Release from a Maven archetype
Outline
- Install base packages for all scenarios
- Install packages based on deployment approach (choose one)
- Packages for zip approach (no build)
- Packages for build
- Install OpenDaylight (choose one)
- From zip
- Build from git
- Build from Maven archetype
- Configure ODL binary in OS
- Troubleshooting
Install required packages
Install base packages for all scenarios
First, in order to ensure security, update your Operating System packages. This will take a while.
Ubuntu
$ sudo apt-get -y update
CentOS
$ sudo yum -y update
Install utility packages for all scenarios
Install the following utility packages, to help us fetch, inflate and edit resources.
Ubuntu
$ sudo apt-get -y install unzip vim wget
CentOS
$ sudo yum -y install unzip vim wget
Install packages for zip approach
UPDATE: Click here if you would like to install OpenDaylight on Ubuntu LTS 20.04.
Install JAVA 8
This section walks you through installing packages that you need to run the binary from the release zip. If you would like to build OpenDaylight, skip ahead to Install packages for build
In order to run OpenDaylight, you need to install and configure JAVA 8. You can just download the JRE if you do not plan to build.
Ubuntu
$ sudo apt-get -y install openjdk-8-jre
Centos
$ sudo yum -y install java-1.8.0-openjdk
Run the following command to see if you OS points to Java 8, if not select it from the list. Either way, copy the path to the binary, so you can update JAVA_HOME in the next step.
Ubuntu
$ sudo update-alternatives --config java
There is only one alternative in link group java (providing /usr/bin/java): /usr/lib/jvm/java-8-openjdk-amd64/jre/bin/java
Nothing to configure.
CentOS
$ sudo alternatives --config java

There is 1 program that provides 'java'.

  Selection    Command
-----------------------------------------------
*+ 1           java-1.8.0-openjdk.x86_64 (/usr/lib/jvm/java-1.8.0-openjdk-1.8.0.171-8.b10.el7_5.x86_64/jre/bin/java)
In the Ubuntu example, the JAVA 8 binary lives in the easy to read /usr/lib/jvm/java-8-openjdk-amd64/jre/bin/java.
In the CentOS example, the JAVA 8 binary lives in the more complicated /usr/lib/jvm/java-1.8.0-openjdk-1.8.0.171-8.b10.el7_5.x86_64/jre/bin/java.
Once you find yours, remove the bin/java from the path and add $JAVA_HOME to your environment by adding the following line to ~/.bashrc:
Ubuntu
export JAVA_HOME=/usr/lib/jvm/java-8-openjdk-amd64/jre
CentOS
Note: Your path may be different depending on the version you downloaded.
export JAVA_HOME=/usr/lib/jvm/java-1.8.0-openjdk-1.8.0.171-8.b10.el7_5.x86_64/jre
Reload your profile and then check that $JAVA_HOME lives in your environment.
Ubuntu and CentOS
$ source ~/.bashrc
Double check that $JAVA_HOME ends with /jre.
Ubuntu
$ echo $JAVA_HOME
/usr/lib/jvm/java-8-openjdk-amd64/jre
CentOS
$ echo $JAVA_HOME
/usr/lib/jvm/java-1.8.0-openjdk-1.8.0.171-8.b10.el7_5.x86_64/jre
Install Packages for build approach
Install JAVA 8
This section describes additional packages you must install to build the OpenDaylight source. If you just plan to run the most recent distribution as a binary, skip this section and proceed to Install OpenDaylight from zip.
NOTE: If you plan to build, ensure you install openjdk-8-jdk (Ubuntu) or java-1.8.0-openjdk-devel (Centos) or otherwise your JAVA environment will miss tools.jar and you will receive the error "Could not find artifact com.sun:tools:jar:1.8.0 at specified path."
Ubuntu
$ sudo apt-get -y install openjdk-8-jdk
Centos
$ sudo yum -y install sudo yum -y install java-1.8.0-openjdk-devel
Run the following command to see if you OS points to Java 8, if not select it from the list. Either way, copy the path to the binary, so you can update JAVA_HOME in the next step.
Ubuntu
$ sudo update-alternatives --config java
There is only one alternative in link group java (providing /usr/bin/java): /usr/lib/jvm/java-8-openjdk-amd64/jre/bin/java
Nothing to configure.
Centos
$ sudo alternatives --config java
There is 1 program that provides 'java'.

  Selection    Command
-----------------------------------------------
*+ 1           java-1.8.0-openjdk.x86_64 (/usr/lib/jvm/java-1.8.0-openjdk-1.8.0.171-8.b10.el7_5.x86_64/jre/bin/java)
By default, the operating system points to the JRE Java binary. This works fine as long as you set $JAVA_HOME to point to the JDK root.
In my Ubuntu example, nonetheless, the JAVA 8 binary lives in /usr/lib/jvm/java-8-openjdk-amd64/jre/bin/java.
In my CENTOS example, the JAVA 8 binary lives in /usr/lib/jvm/java-1.8.0-openjdk-1.8.0.171-8.b10.el7_5.x86_64/jre/bin/java.
Once you find your path, remove /jre/bin/java from the path. It's critical to remove the /jre from the path!
Add $JAVA_HOME to your environment by adding the following line to ~/.bashrc:
Ubuntu
export JAVA_HOME=/usr/lib/jvm/java-8-openjdk-amd64
CentOS
Note: Your path may be different depending on the version you downloaded.
export JAVA_HOME=/usr/lib/jvm/java-1.8.0-openjdk-1.8.0.171-8.b10.el7_5.x86_64
Reload your profile and then check that $JAVA_HOME lives in your environment.
Ubuntu and CentOS
$ source ~/.bashrc
Double check that $JAVA_HOME does not have /jre.
Ubuntu
$  echo $JAVA_HOME
/usr/lib/jvm/java-8-openjdk-amd64
CentOS
$ echo $JAVA_HOME
/usr/lib/jvm/java-1.8.0-openjdk-1.8.0.171-8.b10.el7_5.x86_64
Install utility packages for build
If you plan to build OpenDaylight, you need Git to fetch the release source code. If you do not plan to build OpenDaylight, skip this section and proceed to Install OpenDaylight from zip.
Ubuntu
$ sudo apt-get -y install git
CentOS
$ sudo yum -y install git
Install Maven
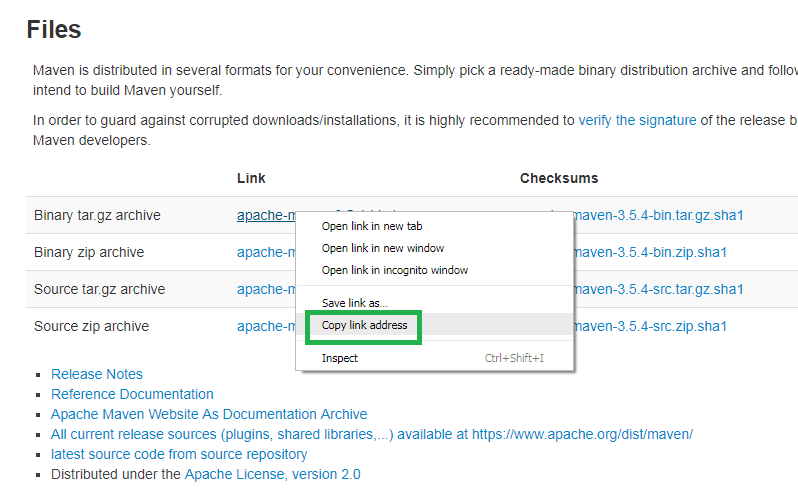
You will need Maven to build OpenDaylight. Navigate to the Maven download page. Find the section that reads Files and right click the link for "Binary tar.gz archive." Select "Copy Link Address."
Download the most recent Maven source code. In my case, I download v3.5.4.
Ubuntu and CentOS
$ wget http://download.nextag.com/apache/maven/maven-3/3.5.4/binaries/apache-maven-3.5.4-bin.tar.gz
Now install Maven. Create the directory for the Maven binary, move the archive there and then deflate the archive to the Maven binary directory. Be sure to change the version in the commands below if you did not download Maven v3.5.4.
Ubuntu and CentOS
$ sudo mkdir /usr/local/apache-maven
$ sudo mv apache-maven-3.5.4-bin.tar.gz /usr/local/apache-maven
$ sudo tar -xzvf /usr/local/apache-maven/apache-maven-3.5.4-bin.tar.gz -C /usr/local/apache-maven/
Install maven into your OS path. Again, ensure you use the correct version.
Ubuntu
$ sudo update-alternatives --install /usr/bin/mvn mvn /usr/local/apache-maven/apache-maven-3.5.4/bin/mvn 1
$ sudo update-alternatives --config mvn
CentOS
$ sudo alternatives --install /usr/bin/mvn mvn /usr/local/apache-maven/apache-maven-3.5.4/bin/mvn 1
$ sudo alternatives --config mvn
Now add the required environment variables to ~/.bashrc. Again, ensure you record the same version you downloaded. If you have a ton of memory on your servers, you can increase the minimum and maximum.
Ubuntu and CentOS
export M2_HOME=/usr/local/apache-maven/apache-maven-3.5.4
export MAVEN_OPTS="-Xms256m -Xmx512m" # Very important to put the "m" on the end
Source your profile and double check the environment variables.
Ubuntu and CentOS
$ source ~/.bashrc
$ echo 'M2_HOME='$M2_HOME; echo 'MAVEN_OPTS='$MAVEN_OPTS
M2_HOME=/usr/local/apache-maven/apache-maven-3.5.4
MAVEN_OPTS=-Xms256m -Xmx512m
Finally, if you want to build OpenDaylight, you will need to copy the official settings.xml file from OpenDaylight's odlparent repository. Delete any existing .m2 file before you execute the copy.
Ubuntu and CentOS
$ rm -rf ~/.m2
$ curl https://raw.githubusercontent.com/opendaylight/odlparent/master/settings.xml --create-dirs -o ~/.m2/settings.xml
  % Total    % Received % Xferd  Average Speed   Time    Time     Time  Current
                                 Dload  Upload   Total   Spent    Left  Speed
100  2756  100  2756    0     0  15090      0 --:--:-- --:--:-- --:--:-- 15142
Install OpenDaylight release from zip
The OpenDaylight release zip provides the easiest way to get OpenDaylight up and running. Continue with this section to run the current release. If you would like to build OpenDaylight, skip this section and proceed to Build OpenDaylight
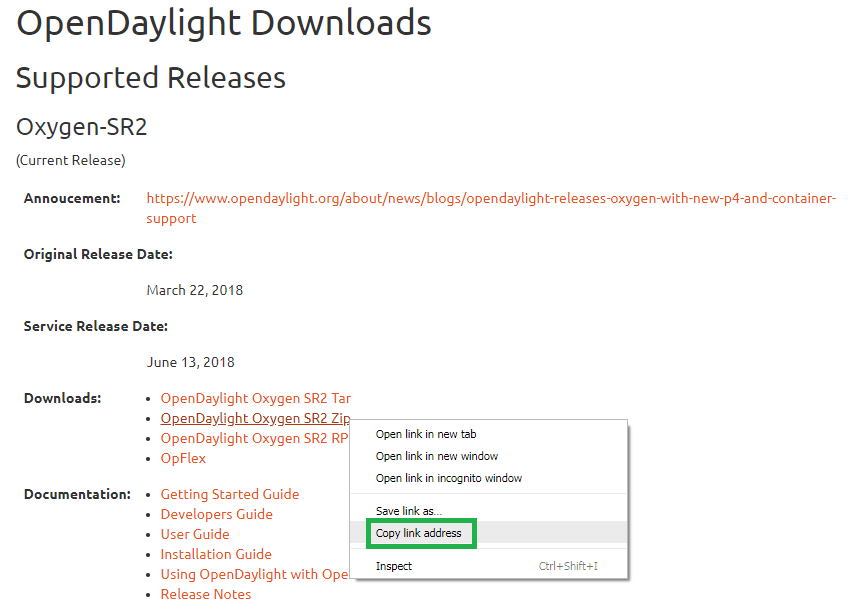
Navigate to the OpenDaylight downloads page, Right click the link for the most recent zip and the select "Copy link address."
Download the OpenDaylight source via WGET.
Ubuntu and CentOS
$ wget https://nexus.opendaylight.org/content/repositories/public/org/opendaylight/integration/karaf/0.8.2/karaf-0.8.2.zip
Unzip the package. Again, ensure you use the version you downloaded.
Ubuntu and CentOS
$ unzip karaf-0.8.2.zip
Enter the new directory and start OpendayLight.
Ubuntu and CentOS
$ cd karaf-0.8.2
[karaf-0.8.2]$ ./bin/karaf
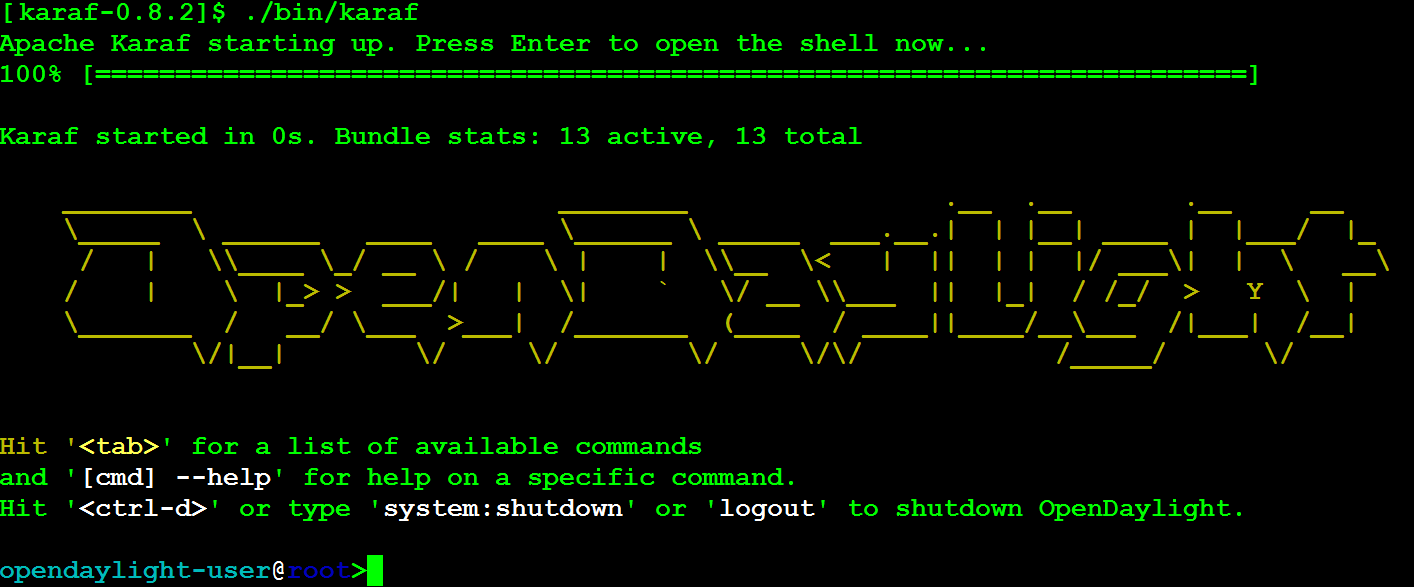
Now, since you installed the release distribution, you will be able to choose from all features for install.
Ubuntu and CentOS
opendaylight-user@root>feature:list

Build OpenDaylight
If you would like to build the current release without using a Maven archetype, proceed to the next section. Otherwise, skip ahead to Build OpenDaylight from a Maven archetype
Build the current OpenDaylight release from git source
Double check that you went through all the preliminary steps recorded at the beginning of this blog post: Install JAVA SDK (Not JRE), Maven, wget, unzip and git; set the JAVA_HOME, M2_HOME and MAVEN_OPTS environment variables; and copy settings.xml from odlparent.
Clone the OpenDaylight repository from Git.
Ubuntu and CentOS
$ git clone https://git.opendaylight.org/gerrit/integration/distribution
This creates a directory named distribution. Enter this directory.
Ubuntu and CentOS
$ cd distribution/
If you look, you will see this distribution includes branches of previous releases.
Ubuntu and CentOS
$ git branch -a
* master
  remotes/origin/HEAD -> origin/master
  remotes/origin/master
  remotes/origin/stable/beryllium
  remotes/origin/stable/boron
  remotes/origin/stable/carbon
  remotes/origin/stable/helium
  remotes/origin/stable/lithium
  remotes/origin/stable/nitrogen
  remotes/origin/stable/oxygen
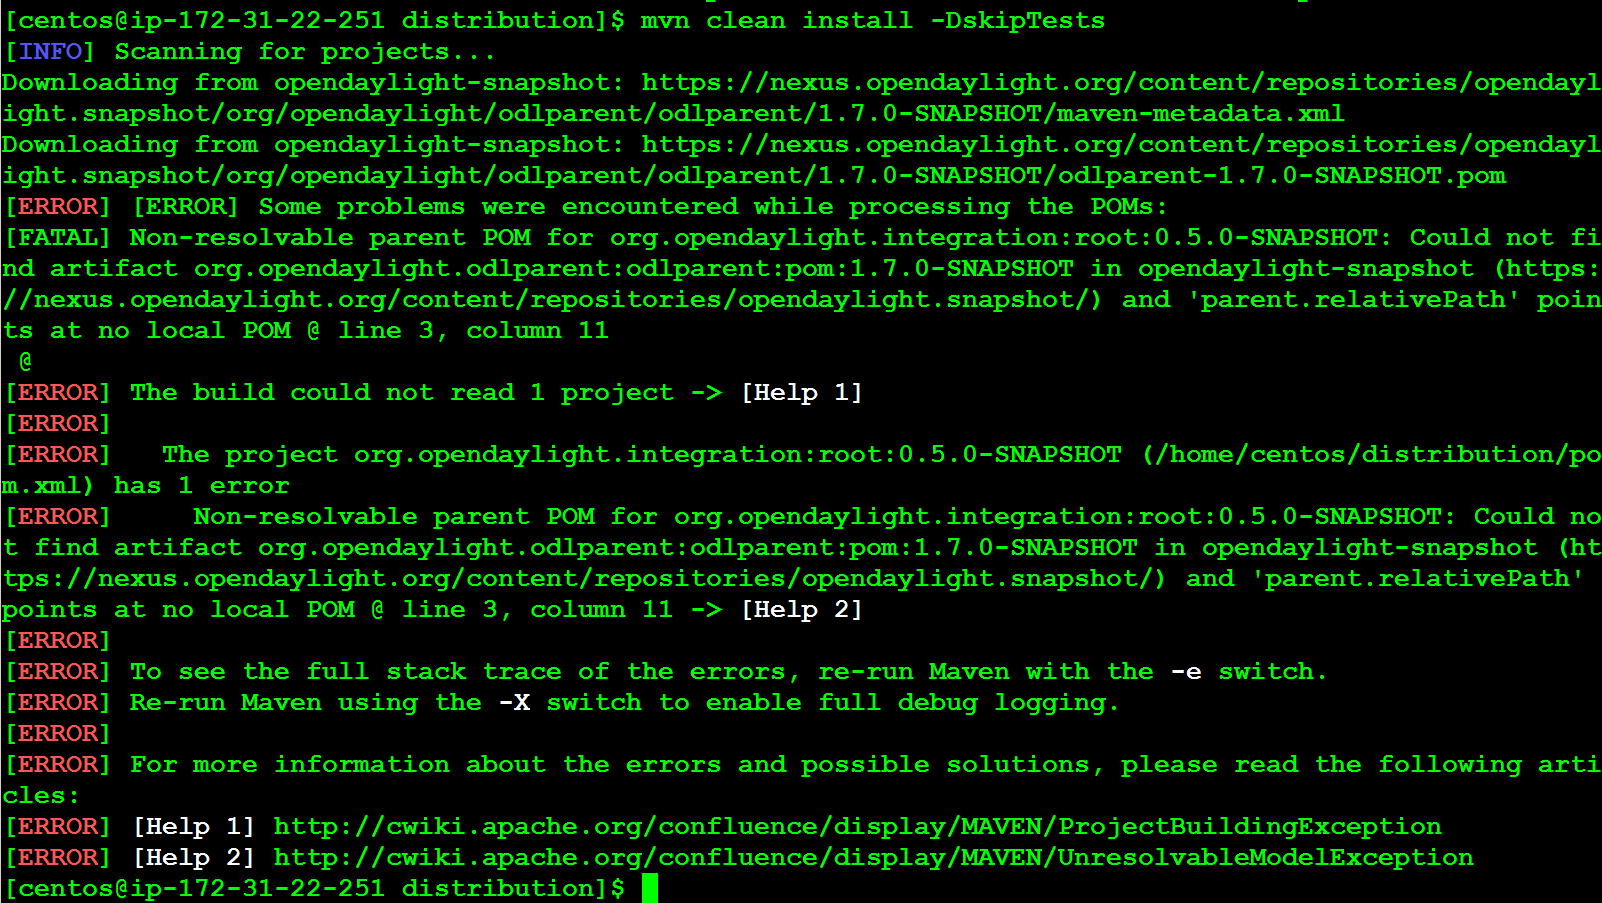
If you switch releases, you may be tempted to attempt to build. Due to the nature OpenDaylight snapshots, however, you will not be able to build.
In the screengrab below, I attempt to build the Helium release. The operation fails with the error "Non-resolvable parent POM for org.opendaylight.integration:root:0.5.0-SNAPSHOT: Could not find artifact org.opendaylight.odlparent:odlparent:pom:1.7.0-SNAPSHOT."
(If you would like to build a previous release, then skip to the Build OpenDaylight from a Maven architype section below.)
From the master branch then, execute the Maven build/install. This will take a long time (~5 minutes).
Ubuntu and CentOS
[distribution]$ mvn clean install -DskipTests
After about five minutes, the build completes.
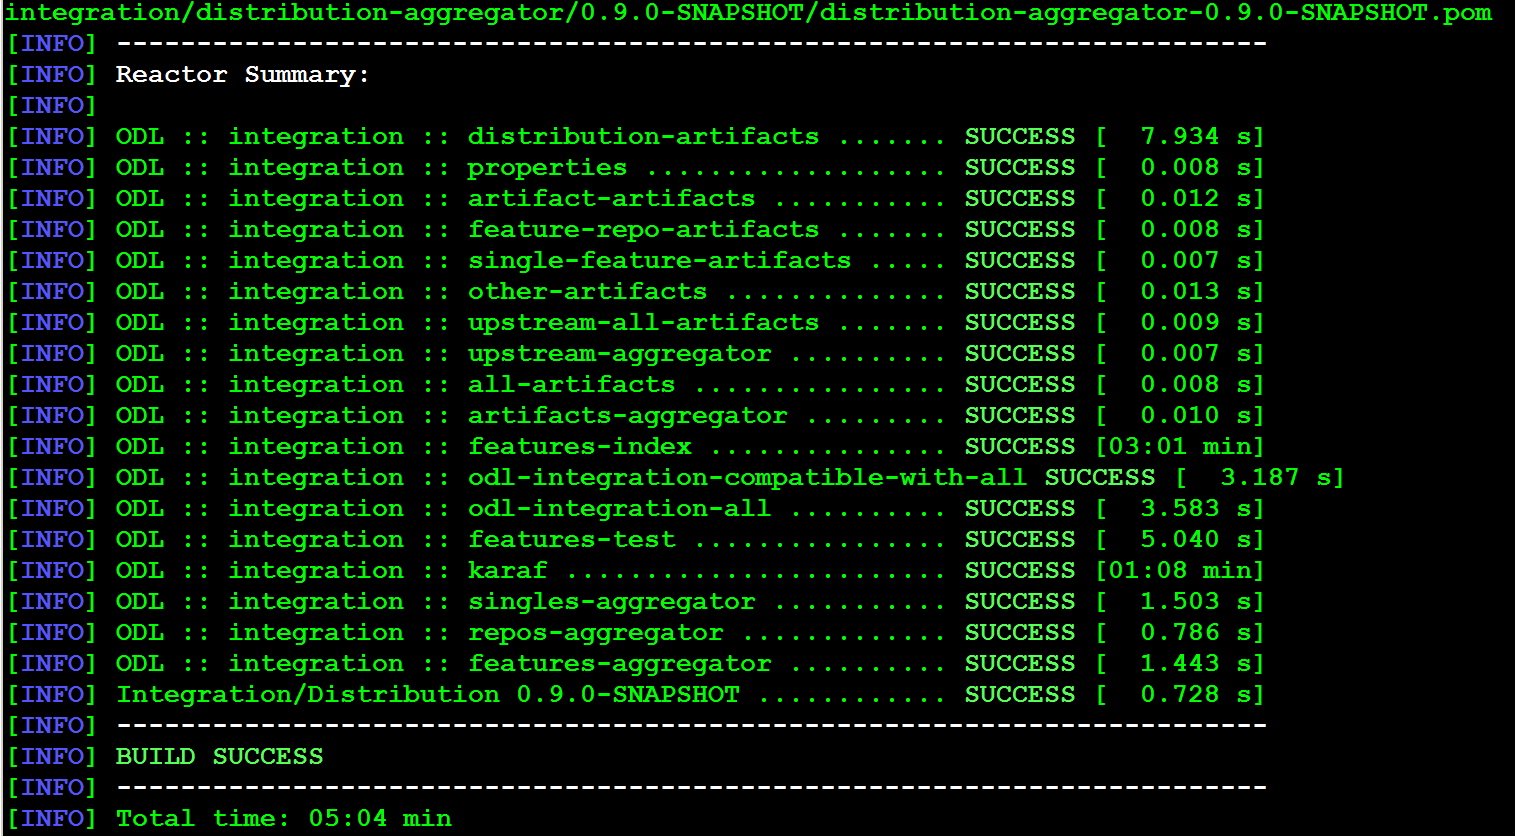
Now you can start OpenDaylight.
Ubuntu and CentOS
[distribution]$ ./karaf/target/assembly/bin/karaf
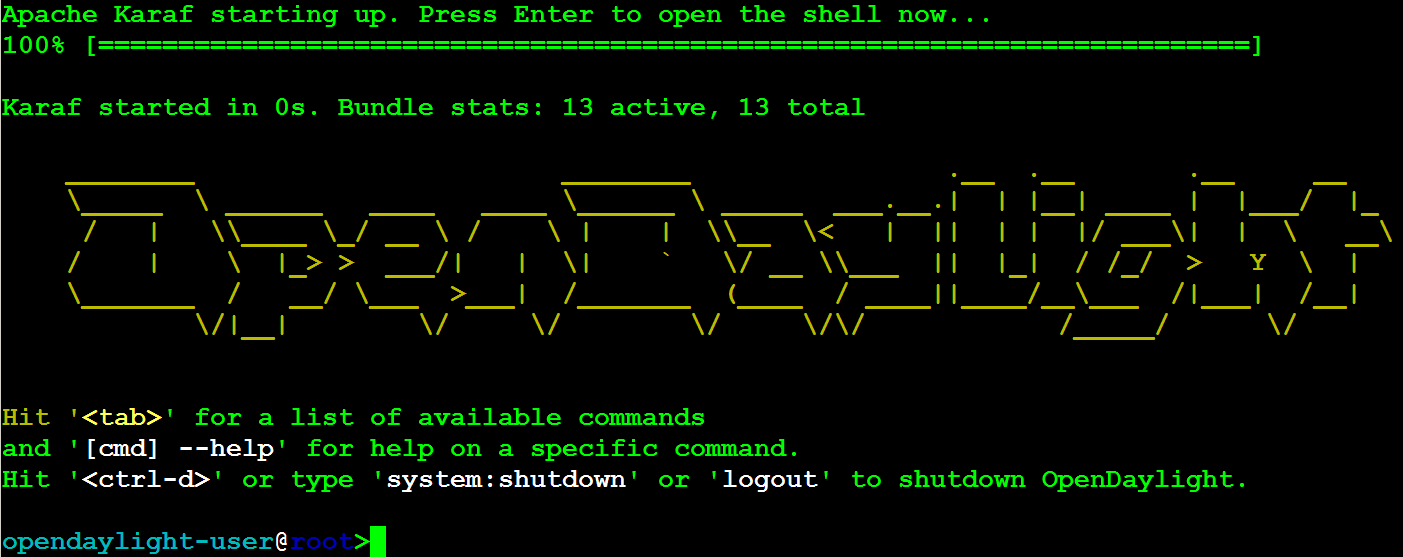
This approach builds all OpenDaylight features.
Ubuntu and CentOS
opendaylight-user@root>feature:list
Build OpenDaylight from a Maven archetype
Double check that you went through all the preliminary steps recorded in Install packages for build: Install JAVA SDK (Not JRE), Maven, wget, unzip and git; set the JAVA_HOME, M2_HOME and MAVEN_OPTS environment variables; and copy settings.xml from odlparent.
Before we begin, create a workdir and cd into it.
$ mkdir workdir
$ cd workdir
[~/workdir]$
The Maven Archetype approach allows you to build earlier versions of OpenDaylight. In order to do so, you simply run the archetype:generate command with the desired snapshot.
The following table shows available archeypes.
| GROUP_ID | ARTIFACT_ID | ARCHETYPE_VERSION |
|---|---|---|
| org.opendaylight.controller | opendaylight-startup-archetype | 1.5.2 |
| org.opendaylight.controller | opendaylight-startup-archetype | 1.5.1 |
| org.opendaylight.controller | opendaylight-startup-archetype | 1.5.0 |
| org.opendaylight.controller | opendaylight-startup-archetype | 1.4.3 |
| org.opendaylight.controller | opendaylight-startup-archetype | 1.4.2 |
| org.opendaylight.controller | opendaylight-startup-archetype | 1.4.1 |
| org.opendaylight.controller | opendaylight-startup-archetype | 1.4.0 |
| org.opendaylight.controller | opendaylight-startup-archetype | 1.3.4-Carbon |
| org.opendaylight.controller | opendaylight-startup-archetype | 1.3.3-Carbon |
| org.opendaylight.controller | opendaylight-startup-archetype | 1.3.2-Carbon |
| org.opendaylight.controller | opendaylight-startup-archetype | 1.3.1-Carbon |
| org.opendaylight.controller | opendaylight-startup-archetype | 1.3.0-Carbon |
| org.opendaylight.controller | opendaylight-startup-archetype | 1.2.4-Boron-SR4 |
| org.opendaylight.controller | opendaylight-startup-archetype | 1.2.3-Boron-SR3 |
| org.opendaylight.controller | opendaylight-startup-archetype | 1.2.2-Boron-SR2 |
| org.opendaylight.controller | opendaylight-startup-archetype | 1.2.1-Boron-SR1 |
| org.opendaylight.controller | opendaylight-startup-archetype | 1.2.0-Boron |
| org.opendaylight.controller | opendaylight-startup-archetype | 1.1.4-Beryllium-SR4 |
| org.opendaylight.controller | opendaylight-startup-archetype | 1.1.3-Beryllium-SR3 |
| org.opendaylight.controller | opendaylight-startup-archetype | 1.1.2-Beryllium-SR2 |
| org.opendaylight.controller | opendaylight-startup-archetype | 1.1.1-Beryllium-SR1 |
| org.opendaylight.controller | opendaylight-startup-archetype | 1.1.0-Beryllium |
| org.opendaylight.controller | opendaylight-startup-archetype | 1.0.4-Lithium-SR4 |
| org.opendaylight.controller | opendaylight-startup-archetype | 1.0.3-Lithium-SR3 |
| org.opendaylight.controller | opendaylight-startup-archetype | 1.0.2-Lithium-SR2 |
| org.opendaylight.controller | opendaylight-startup-archetype | 1.0.1-Lithium-SR1 |
| org.opendaylight.controller | opendaylight-startup-archetype | 1.0.0-Lithium |
To make life easy, I recommend you use environment variables before you run archetype::generate.
This example shows the archetype generation for Nitrogen.
Ubuntu and CentOS
[~/workdir]$ export GROUP_ID=org.opendaylight.controller
[~/workdir]$ export ARTIFACT_ID=opendaylight-startup-archetype
[~/workdir]$ export ARCHETYPE_VERSION=1.4.0
Now run archetype:generate (note the use of environment variables).
[~workdir]$ mvn archetype:generate -DarchetypeGroupId=$GROUP_ID -DarchetypeArtifactId=$ARTIFACT_ID -DarchetypeRepository=http://nexus.opendaylight.org/content/repositories/opendaylight.release/ -DarchetypeCatalog=remote -DarchetypeVersion=$ARCHETYPE_VERSION
Enter the following commands to the menu choices.
Ubuntu and CentOS
Define value for property 'groupId': org.opendaylight.example
Define value for property 'artifactId': example
Define value for property 'version' 0.1.0: : <hit Enter>
Define value for property 'package' org.opendaylight.example: : <hit Enter>
Define value for property 'classPrefix' Example: : ${artifactId.substring(0,1).toUpperCase()}${artifactId.substring(1)}
Define value for property 'copyright': FreshLEX, LLC
Define value for property 'copyrightYear' 2017: : 2018
Y: : <hit enter>
The Maven archetype created a directory named example. Enter into that directory.
Ubuntu and CentOS
[~/workdir]$ cd example
[example]]$ ls
api  artifacts  cli  deploy-site.xml  features  impl  it  karaf  pom.xml  src  target
Now build the release.
Ubuntu and CentOS
[example]$ mvn clean install -DskipTests
If you get any errors, delete your ~/.m2 files and re-download settings.xml as described in Install packages for build.
After a few minutes, your build completes:
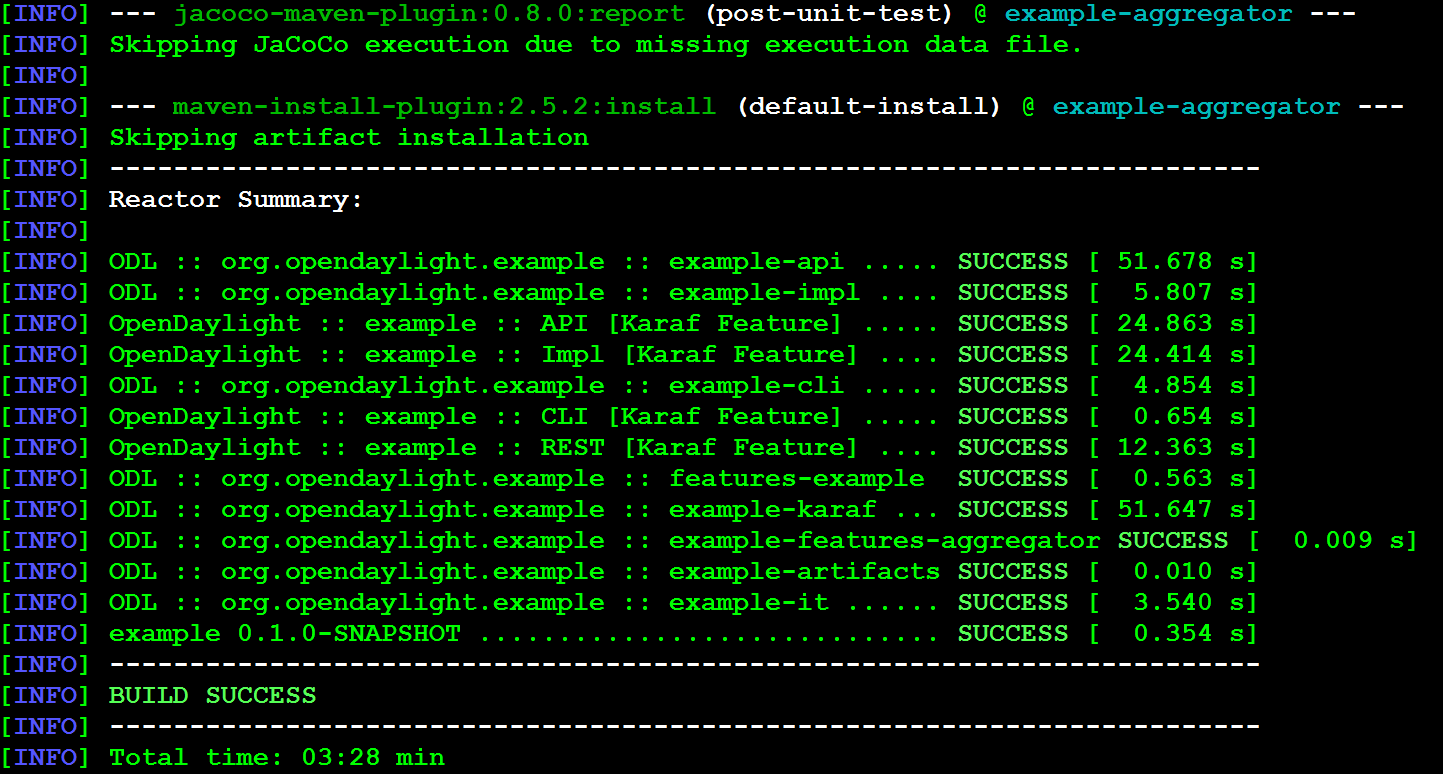
Now start Karaf:
Ubuntu and CentOS
$ ./karaf/target/assembly/bin/karaf
Conclusion
I hope that you enjoyed this blog post. If you would like to try out OpenDaylight, check out the blog post I wrote for Oracle Ravello here.
In 2015 I presented a demo at the Linux Foundation OpenDaylight summit in Santa Clara, Califonia. You can read the slides here or watch the video here.
Finally, I had an active presence on the OpenDaylight ask forums, which have since migrated to StackOverflow.