The RabbitMQ website provides instructions on how to install the service on CentOS and Ubuntu Elastic Compute Cloud (EC2) instances. While the Amazon Linux distro uses CentOS as a base, it is different enough to make installing RabbitMQ tricky for system admins. I have identified and addressed the challenges here, and provide instructions on how to install RabbitMQ on Amazon Linux without dificulty.
- Determine the init system
- Set up a simple RPM build environment
- Build and install the minimal Erlang runtime
- Install and configure RabbitMQ
- Create and deploy a RabbitMQ Security Group
1. Determine the init system
I can boil all of the confusion down to the fact that CentOS changed its init system between the evolution of CentOS 6 to CentOS 7. If you are not a rabid CentOS follower, you would not know this, and not realize that one change would be the root cause of installation pain. Amazon Linux currently runs a version of CentOS 6, and therefore uses the original sysvinit system. The current CentOS 7 runs systemd.
You do not need to know the difference between the two, but rather, which version Amazon Linux supports.
[ec2-user@ip-172-31-4-69 ~]$ if (pidof /sbin/init) ; then echo "sysvinit"; elif (pidof systemd); then echo "systemd"; fi | sed -n '1!p'
sysvinit
[ec2-user@ip-172-31-4-69 ~]$
As of May 2017, Amazon Linux uses sysvinit. In order to accomodate sysvinit, you need to download RPMs made for CentOS 6 (i.e. include el6 in the name).
2. Set up an RPM build system
First, install the tools you need to build an RPM.
[ec2-user@ip-172-31-4-69 ~]$ sudo yum -y install rpm-build redhat-rpm-config
Loaded plugins: priorities, update-motd, upgrade-helper
amzn-main                                                                              | 2.1 kB  00:00:00
amzn-updates                                                                           | 2.3 kB  00:00:00
Resolving Dependencies

...

Installed:
  rpm-build.x86_64 0:4.11.3-21.75.amzn1              system-rpm-config.noarch 0:9.0.3-42.28.amzn1

Dependency Installed:
  elfutils.x86_64 0:0.163-3.18.amzn1 elfutils-libs.x86_64 0:0.163-3.18.amzn1   gdb.x86_64 0:7.6.1-64.33.amzn1
  patch.x86_64 0:2.7.1-8.9.amzn1     perl-Thread-Queue.noarch 0:3.02-2.5.amzn1

Complete!
[ec2-user@ip-172-31-4-69 ~]$
Now, create the build environment. Here, you are creating the needed sub directories for a build environment. For details, see https://wiki.centos.org/HowTos/SetupRpmBuildEnvironment
[ec2-user@ip-172-31-4-69 ~]$ cd
[ec2-user@ip-172-31-4-69 ~]$ mkdir -p ~/rpmbuild/{BUILD,RPMS,SOURCES,SPECS,SRPMS}
[ec2-user@ip-172-31-4-69 ~]$ echo '%_topdir %(echo $HOME)/rpmbuild' > ~/.rpmmacros
[ec2-user@ip-172-31-4-69 ~]$ cat .rpmmacros
%_topdir %(echo $HOME)/rpmbuild
[ec2-user@ip-172-31-4-69 ~]$ ls rpmbuild/
BUILD  RPMS  SOURCES  SPECS  SRPMS
[ec2-user@ip-172-31-4-69 ~]$
Now install the development tools.
[ec2-user@ip-172-31-4-69 ~]$ sudo yum -y install autoconf gcc git ncurses-devel openssl-devel
Loaded plugins: priorities, update-motd, upgrade-helper
amzn-main                                                                              | 2.1 kB  00:00:00
amzn-updates                                                                           | 2.3 kB  00:00:00
Resolving Dependencies
--> Running transaction check

...


Installed:
  autoconf.noarch 0:2.69-11.9.amzn1                   gcc.noarch 0:4.8.3-3.20.amzn1
  git.x86_64 0:2.7.4-1.47.amzn1                       ncurses-devel.x86_64 0:5.7-4.20090207.14.amzn1
  openssl-devel.x86_64 1:1.0.1k-15.99.amzn1


Dependency Installed:
  cpp48.x86_64 0:4.8.3-9.111.amzn1                       gcc48.x86_64 0:4.8.3-9.111.amzn1
  glibc-devel.x86_64 0:2.17-157.169.amzn1                glibc-headers.x86_64 0:2.17-157.169.amzn1
  kernel-headers.x86_64 0:4.9.27-14.31.amzn1             keyutils-libs-devel.x86_64 0:1.5.8-3.12.amzn1
  krb5-devel.x86_64 0:1.14.1-27.41.amzn1                 libcom_err-devel.x86_64 0:1.42.12-4.40.amzn1
  libkadm5.x86_64 0:1.14.1-27.41.amzn1                   libselinux-devel.x86_64 0:2.1.10-3.22.amzn1
  libsepol-devel.x86_64 0:2.1.7-3.12.amzn1               libgomp.x86_64 0:4.8.3-9.111.amzn1
  libmpc.x86_64 0:1.0.1-3.3.amzn1                        libverto-devel.x86_64 0:0.2.5-4.9.amzn1
  m4.x86_64 0:1.4.16-9.10.amzn1                          mpfr.x86_64 0:3.1.1-4.14.amzn1
  perl-Data-Dumper.x86_64 0:2.145-3.5.amzn1              perl-Error.noarch 1:0.17020-2.9.amzn1
  perl-Git.noarch 0:2.7.4-1.47.amzn1                     perl-TermReadKey.x86_64 0:2.30-20.9.amzn1
  zlib-devel.x86_64 0:1.2.8-7.18.amzn1


Complete!
[ec2-user@ip-172-31-4-69 ~]$
Pull the source code for minimal Erlang from git.
[ec2-user@ip-172-31-4-69 ~]$ git clone https://github.com/rabbitmq/erlang-rpm.git
Cloning into 'erlang-rpm'...
remote: Counting objects: 258, done.
remote: Total 258 (delta 0), reused 0 (delta 0), pack-reused 258
Receiving objects: 100% (258/258), 55.33 KiB | 0 bytes/s, done.
Resolving deltas: 100% (147/147), done.
Checking connectivity... done.
[ec2-user@ip-172-31-4-69 ~]$
3. Build and install the minimal Erlang runtime
Change directories to erlang-rpm to start the build.
[ec2-user@ip-172-31-4-69 ~]$ cd erlang-rpm/
[ec2-user@ip-172-31-4-69 erlang-rpm]$
Execute a make to build the thing. If you encounter any errors, 99.99% of the time the error will be due to missing packages. Simply read the error to identify the missing package and then install that package and execute make once more.
[ec2-user@ip-172-31-4-69 erlang-rpm]$ make
rm -rf BUILDROOT BUILD SOURCES SPECS SRPMS RPMS tmp FINAL_RPMS dist
mkdir -p BUILD SOURCES SPECS SRPMS RPMS tmp dist
wget -O dist/OTP-19.3.4.tar.gz https://github.com/erlang/otp/archive/OTP-19.3.4.tar.gz#
--2017-05-26 17:30:16--  https://github.com/erlang/otp/archive/OTP-19.3.4.tar.gz
Resolving github.com (github.com)... 192.30.253.113, 192.30.253.112
Connecting to github.com (github.com)|192.30.253.113|:443... connected.
HTTP request sent, awaiting response... 302 Found
Location: https://codeload.github.com/erlang/otp/tar.gz/OTP-19.3.4 [following]
--2017-05-26 17:30:16--  https://codeload.github.com/erlang/otp/tar.gz/OTP-19.3.4
Resolving codeload.github.com (codeload.github.com)... 192.30.253.120, 192.30.253.121
Connecting to codeload.github.com (codeload.github.com)|192.30.253.120|:443... connected.
HTTP request sent, awaiting response... 200 OK
Length: unspecified [application/x-gzip]
Saving to: ‘dist/OTP-19.3.4.tar.gz’

dist/OTP-19.3.4.tar.gz          [                <=>                       ]  32.42M  7.73MB/s    in 4.2s

...
For example, the first time I tried to build the erlang-rpm, I got the following error about not finding crypto libraries.
RPM build errors:
    bogus date in %changelog: Thu Oct 13 2015 Michael Klishin <michael@rabbitmq.com> - 18.1
    Directory not found by glob: /home/ec2-user/erlang-rpm/BUILDROOT/erlang-19.3.4-1.amzn1.x86_64/usr/lib64/erlang/lib/crypto-*/
    Directory not found by glob: /home/ec2-user/erlang-rpm/BUILDROOT/erlang-19.3.4-1.amzn1.x86_64/usr/lib64/erlang/lib/ssl-*/
    File not found by glob: /home/ec2-user/erlang-rpm/BUILDROOT/erlang-19.3.4-1.amzn1.x86_64/usr/lib64/erlang/lib/ssl-*/ebin
    File not found by glob: /home/ec2-user/erlang-rpm/BUILDROOT/erlang-19.3.4-1.amzn1.x86_64/usr/lib64/erlang/lib/ssl-*/src
make: *** [erlang] Error 1
A quick Google search for "rpm build errors file not found buildroot crypto" leads me to the following page with the following solution:
It turns out during my first attempt, I negleted to install openssl-devel. To fix the Error, I installed openssl-devel...
[ec2-user@ip-172-31-4-69 erlang-rpm]$ sudo yum -y install openssl-devel
Loaded plugins: priorities, update-motd, upgrade-helper
amzn-main                                                                              | 2.1 kB  00:00:00
amzn-updates                                                                           | 2.3 kB  00:00:00
Resolving Dependencies
--> Running transaction check

...


Installed:
  openssl-devel.x86_64 1:1.0.1k-15.99.amzn1

Dependency Installed:
  keyutils-libs-devel.x86_64 0:1.5.8-3.12.amzn1            krb5-devel.x86_64 0:1.14.1-27.41.amzn1
  libcom_err-devel.x86_64 0:1.42.12-4.40.amzn1             libkadm5.x86_64 0:1.14.1-27.41.amzn1
  libselinux-devel.x86_64 0:2.1.10-3.22.amzn1              libsepol-devel.x86_64 0:2.1.7-3.12.amzn1
  libverto-devel.x86_64 0:0.2.5-4.9.amzn1                  zlib-devel.x86_64 0:1.2.8-7.18.amzn1

Complete!
[ec2-user@ip-172-31-4-69 erlang-rpm]$
...and run make again (from the erlang-rpm directory).
After a while the compile will succeed. You will see success.
Wrote: /home/ec2-user/erlang-rpm/RPMS/x86_64/erlang-19.3.4-1.amzn1.x86_64.rpm
Wrote: /home/ec2-user/erlang-rpm/RPMS/x86_64/erlang-debuginfo-19.3.4-1.amzn1.x86_64.rpm
Executing(%clean): /bin/sh -e /home/ec2-user/erlang-rpm/tmp/rpm-tmp.ekgXf8
+ umask 022
+ cd /home/ec2-user/erlang-rpm/BUILD
+ cd otp-OTP-19.3.4
+ rm -rf /home/ec2-user/erlang-rpm/BUILDROOT/erlang-19.3.4-1.amzn1.x86_64
+ exit 0
find RPMS -name "*.rpm" -exec sh -c 'mv {} `echo {} | sed 's#^RPMS\/noarch#FINAL_RPMS#'`' ';'
mv: ‘RPMS/x86_64/erlang-debuginfo-19.3.4-1.amzn1.x86_64.rpm’ and ‘RPMS/x86_64/erlang-debuginfo-19.3.4-1.amzn1.x86_64.rpm’ are the same file
mv: ‘RPMS/x86_64/erlang-19.3.4-1.amzn1.x86_64.rpm’ and ‘RPMS/x86_64/erlang-19.3.4-1.amzn1.x86_64.rpm’ are the same file
Before you install Erlang, delete any old versions.
[ec2-user@ip-172-31-4-69 erlang-rpm]$ sudo yum -y remove erlang-*
Loaded plugins: priorities, update-motd, upgrade-helper
No Match for argument: erlang-*
No Packages marked for removal
[ec2-user@ip-172-31-4-69 erlang-rpm]$
Now, install the Erlang RPM you just built. You will find it in the RPMS/x86_64/ directory. It will most likely have a different name than the one I use below. Either way, notice that the RPM includes amzn1 in its filename.
[ec2-user@ip-172-31-4-69 erlang-rpm]$ sudo yum -y install RPMS/x86_64/erlang-19.3.4-1.amzn1.x86_64.rpm
Loaded plugins: priorities, update-motd, upgrade-helper
Examining RPMS/x86_64/erlang-19.3.4-1.amzn1.x86_64.rpm: erlang-19.3.4-1.amzn1.x86_64
Marking RPMS/x86_64/erlang-19.3.4-1.amzn1.x86_64.rpm to be installed
Resolving Dependencies

...

Running transaction
  Installing : erlang-19.3.4-1.amzn1.x86_64                                                               1/1
  Verifying  : erlang-19.3.4-1.amzn1.x86_64                                                               1/1

Installed:
  erlang.x86_64 0:19.3.4-1.amzn1

Complete!
[ec2-user@ip-172-31-4-69 erlang-rpm]$
4. Install and configure RabbitMQ
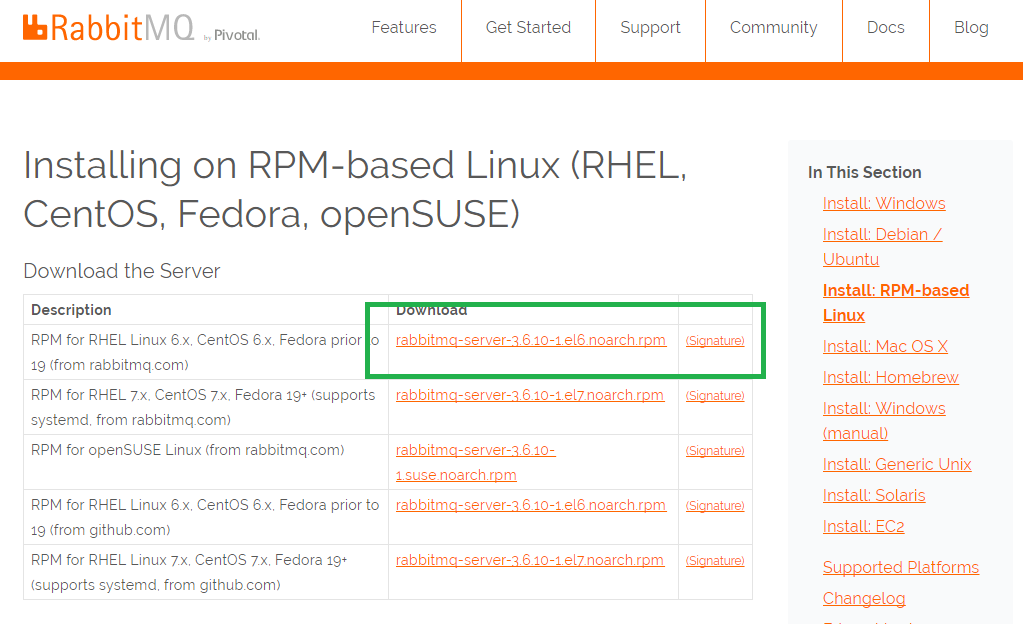
You can follow the instructions on the RabbitMQ web site to install the service. Remember, in step one we discovered that the current version of Amazon linux uses sysvinit. We, therefore, need to download the CentOS 6/ EL6 RPM.
Hot Tip: If you run sysvinit, then download the RabbitMQ RPM with el6 in the name. If you run systemd, download the RabbitMQ RPM with el7 in the name.
Change directories and then wget the RPM. You may have a different URL from this blog post. Go to https://www.rabbitmq.com/install-rpm.html to fetch the most recent RPM URL.
[ec2-user@ip-172-31-4-69 erlang-rpm]$ cd
[ec2-user@ip-172-31-4-69 ~]$ wget https://www.rabbitmq.com/releases/rabbitmq-server/v3.6.10/rabbitmq-server-3.6.10-1.el6.noarch.rpm
--2017-05-26 18:21:28--  https://www.rabbitmq.com/releases/rabbitmq-server/v3.6.10/rabbitmq-server-3.6.10-1.el6.noarch.rpm
Resolving www.rabbitmq.com (www.rabbitmq.com)... 192.240.153.117
Connecting to www.rabbitmq.com (www.rabbitmq.com)|192.240.153.117|:443... connected.
HTTP request sent, awaiting response... 200 OK
Length: 4931483 (4.7M) [application/x-redhat-package-manager]
Saving to: ‘rabbitmq-server-3.6.10-1.el6.noarch.rpm’

rabbitmq-server-3.6.10-1.el 100%[=========================================>]   4.70M  3.58MB/s    in 1.3s

2017-05-26 18:21:30 (3.58 MB/s) - ‘rabbitmq-server-3.6.10-1.el6.noarch.rpm’ saved [4931483/4931483]

[ec2-user@ip-172-31-4-69 ~]$
Now install the signing key. Go to https://www.rabbitmq.com/install-rpm.html to ensure you use the most recent URL.
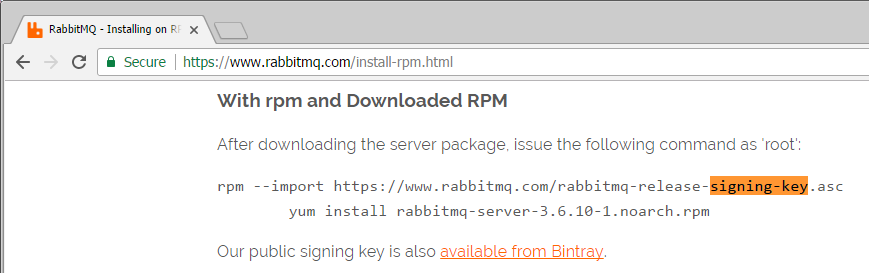
[ec2-user@ip-172-31-4-69 ~]$ sudo rpm --import https://www.rabbitmq.com/rabbitmq-release-signing-key.asc
[ec2-user@ip-172-31-4-69 ~]$
Now install the RPM you just downloaded.
[ec2-user@ip-172-31-4-69 ~]$ sudo yum -y install rabbitmq-server-3.6.10-1.el6.noarch.rpm
Loaded plugins: priorities, update-motd, upgrade-helper
Examining rabbitmq-server-3.6.10-1.el6.noarch.rpm: rabbitmq-server-3.6.10-1.el6.noarch
Marking rabbitmq-server-3.6.10-1.el6.noarch.rpm to be installed
Resolving Dependencies
amzn-main/latest                                                                       | 2.1 kB  00:00:00
amzn-updates/latest                                                                    | 2.3 kB  00:00:00

...

Installed:
  rabbitmq-server.noarch 0:3.6.10-1.el6

Dependency Installed:
  compat-readline5.x86_64 0:5.2-17.3.amzn1                  socat.x86_64 0:1.7.2.3-1.10.amzn1

Complete!
Use chkconfig to start RabbitMQ on system boot. Then, use the service command to start the service. Since Amazon Linux runs sysvinit, we use the "chkconfig" and "service" commands. For systemd operating systems, we would use "systemctl."
[ec2-user@ip-172-31-4-69 ~]$ sudo chkconfig rabbitmq-server on
[ec2-user@ip-172-31-4-69 ~]$ sudo service rabbitmq-server start
Starting rabbitmq-server: SUCCESS
rabbitmq-server.
[ec2-user@ip-172-31-4-69 ~]$
Once we have RabbitMQ up and running, we can configure it as needed:
[ec2-user@ip-172-31-4-69 ~]$ sudo rabbitmqctl add_user myserver myserver123
Creating user "myserver"
[ec2-user@ip-172-31-4-69 ~]$ sudo rabbitmqctl add_vhost myserver_vhost
Creating vhost "myserver_vhost"
[ec2-user@ip-172-31-4-69 ~]$ sudo rabbitmqctl set_user_tags myserver myserver_tag
Setting tags for user "myserver" to [myserver_tag]
[ec2-user@ip-172-31-4-69 ~]$ sudo rabbitmqctl set_user_tags myserver monitoring
Setting tags for user "myserver" to [monitoring]
[ec2-user@ip-172-31-4-69 ~]$ sudo rabbitmqctl set_permissions -p myserver_vhost myserver ".*" ".*" ".*"
Setting permissions for user "myserver" in vhost "myserver_vhost"
[ec2-user@ip-172-31-4-69 ~]$ sudo rabbitmq-plugins enable rabbitmq_management
The following plugins have been enabled:
  amqp_client
  cowlib
  cowboy
  rabbitmq_web_dispatch
  rabbitmq_management_agent
  rabbitmq_management

Applying plugin configuration to rabbit@ip-172-31-4-69... started 6 plugins.
[ec2-user@ip-172-31-4-69 ~]$ sudo service rabbitmq-server restart
Restarting rabbitmq-server: SUCCESS
rabbitmq-server.
[ec2-user@ip-172-31-4-69 ~]$
5. Create a Security Group
To use the service, punch a hole in the EC2 firewall via a custom security group.
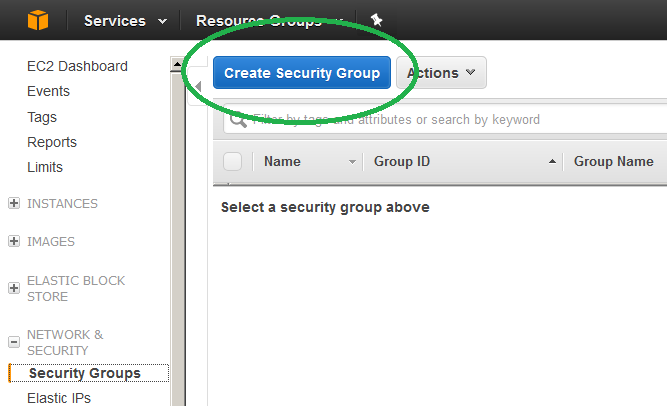
First, on the AWS GUI, select EC2 under compute.
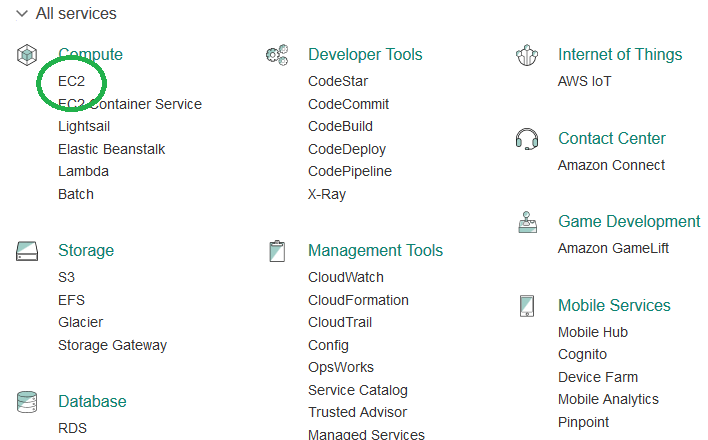
Next, select Security Groups under NETWORK & SECURITY.

Click Create Security Group.
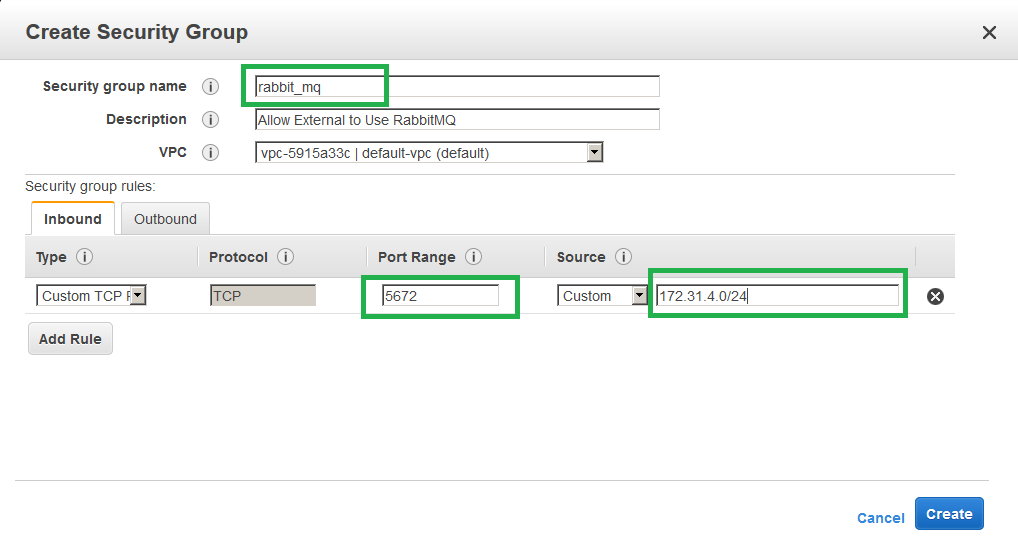
Edit the name to read rabbit_mq, the TCP port range to 5672 and set the network that can access your new RabbitMQ service. In the example below, I set it to the address of my RabbitMQ server's Local Area Network (LAN).
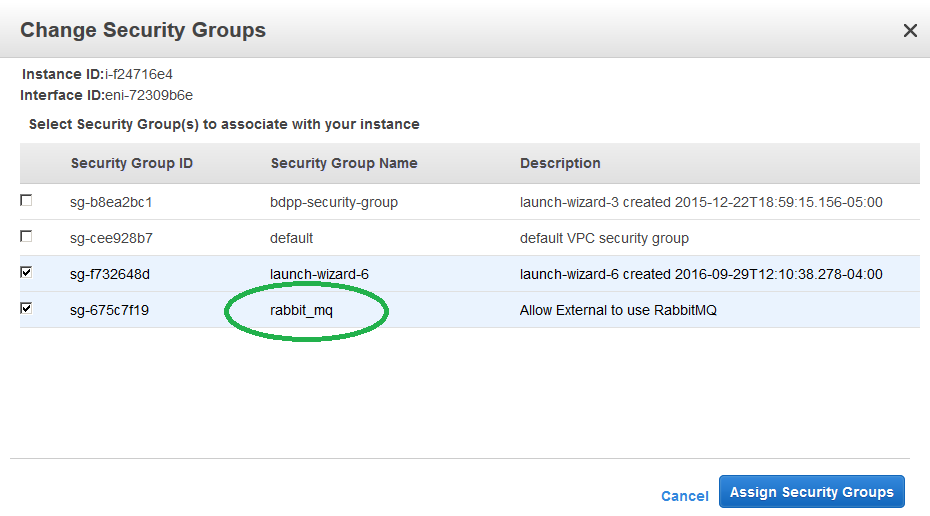
In the EC2 console, click your rabbit_mq server, click Actions, click Networking and then Change Security Groups.

Attach the rabbit_mq security group. If you don't see the security group, ensure you configured the correct VPC when you created the security group.
You now have a dedicated RabbitMQ service. Now you are ready to try a simple "hello world" program.