In this tutorial you will learn
- The best* way to update an AWS provided Elasticsearch service index via an Internet facing web form
- *In terms of flexibility, security and ease of deployment
- How to deploy web forms in Flask
- How to get Flask to send validated web form data to the AWS provided Elasticsearch service
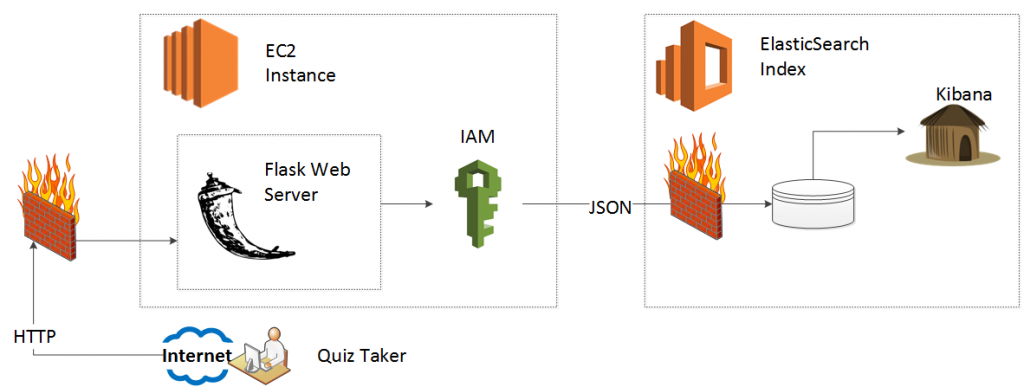
In the last tutorial, we laid the foundation to have auto-scaled or auto-deployed EC2 instances connect to the Amazon provided Elasticsearch service via Identity and Access Management (IAM) roles. Wannabe AWS button mashers copy and paste their access credentials, which works at first and then doesn’t, quickly. We need the IAM approach in order to use the phenomenal, groundbreaking, disruptive and easy to use ElasticBeanstalk service. The IAM roles allow us to use ElasticBeanstalk without any heartburn, since we do not need to worry about hard coded credentials or static IP addresses.
In this tutorial we will evolve our simple python script to an interactive web form. The user enters data into a web form, presses submit and we update our Elasticsearch index.
Again, as of writing this blog in January 2016 I did not find any decent online (or book based) HOWTO for a simple, focused execution of this problem, so you. I struck out on my own and the wealth of options drowned me. How, for example, would I have an Internet facing web form update my AWS provided Elasticsearch index?
- Have the end users’ browser connect directly to the Elasticsearch index
- Have the end users’ browser send a message to a message queue or service bus which mediates the request
- Have the server write the information as a Syslog message and then use Logstash to transform
- Use a Python server to broker the request between client and the Elasticsearch index
After pilot deployments and the arrival of sanity (ponder the comedic levels of insecurity the first approach brings) I decided to have a Python server in line. Of course, this decision necessitates several more. What kind of Python server do I use? Spoiler alert: I tried Django at first but then realized the ORM accommodates RDBMS and does not make sense for a NoSQL (Elasticsearch) document store.
HOT TIP: They built Django for an RDBMS. If you want to use Elasticsearch (or any NoSQL document store) then use Flask.
I quickly settled on Flask, and after using it fell in love with the elegance, simplicity and endless flexibility it brings. Of course, once I decided on Flask I had several more questions (Keep in mind, as of January 2016 every Python NoSQL web database application example I found online uses MongoDB and not Elasticsearch for the backend database).
Once Flask pulls data from the completed form, what do I do next?
- Wrap them as HTTP request objects? (Urrlib3 or Requests?)
- Wrap them as JSON objects?
- Wrap them as low level Elasticsearch Objects?
- Use the python based, abstracted “Domain Specific Language” for Elasticsearch?
After several prototype sessions, I decided that the Elasticsearch DSL won the competition in terms of flexibility, ease of use, abstraction of low level guts and “Pythonic-ness.”
One caveat, if you have a local instance of Elasticsearch you can use the DSL provided save() method for an extended DocType object. Another spoiler alert, if you use the Amazon provided Elasticsearch service you must connect to the service via AWSAuthConnection, and to use AWSAuthoConnection you just need to serialize your DocType object to JSON first. I learned this the hard way so you don’t have to.
HOT TIP: If you use the AWS provided Elasticsearch service, serialize your extended DocType object to JSON and submit a REST request instead of using the ES DSL save()* method.
Go to your home directory. If you are in the Virtual Environment from the first project, execute a “deactivate” command. Now, we will create a new Virtual Environment for this project.
ubuntu@ip-172-31-35-80:~$ ls
connect_to_es
ubuntu@ip-172-31-35-80:~$ mkdir flask_to_es
ubuntu@ip-172-31-35-80:~$ virtualenv -p python2.7 flask_to_es
Running virtualenv with interpreter /usr/bin/python2.7
New python executable in flask_to_es/bin/python2.7
Also creating executable in flask_to_es/bin/python
Installing setuptools, pip...done.
ubuntu@ip-172-31-35-80:~$ cd flask_to_es/
ubuntu@ip-172-31-35-80:~/flask_to_es$ . bin/activate
(flask_to_es)ubuntu@ip-172-31-35-80:~/flask_to_es$
Now you have a virtual environment independent from the last project.
For any of you that have done web development before, you will be familiar with the concept of “model view controller.” If not, I offer the simplest explanation I can think of:
The model contains the database, the view gets data from a user and the controller slaps the data from the user into the database. I of course GREATLY over-simplify things here and suggest you read up on MVC if you care about nuances.
I gave that preamble so you will go along with creating models.py. Models.py will contain the structure of our Elasticsearch index (database) as well as the structure of the web form.
Before we do that run this command for me:
(flask_to_es)ubuntu@ip-172-31-35-80:~/flask_to_es$ pip freeze
argparse==1.2.1
wsgiref==0.1.2
You will see (hopefully no more than two) Python libraries and their versions. We will use the sandboxing of Virtual Environments and the “pip freeze” command to make our life very, very easy when we deploy our server to ElasticBeanstalk in HOWTO-4. Let’s take advantage of library sandboxing now, and install the libraries we need. For this demo, we need:
- boto: Hooks into IAM roles so we don't need to cut and paste credentials
- flask: A Python microframework (You will fall in love)
- datetime: So we can timestamp our entries
- wtforms: Makes web forms a joy to work with
- flask-wtf: A wrapper made just for Flask integration
- elasticsearch_dsl: A domain specific language for Elasticsearch, written in Python
- requests: Use REST to update our Elasticsearch index
(flask_to_es)ubuntu@ip-172-31-35-80:~/flask_to_es$ easy_install boto flask datetime wtforms flask-wtf elasticsearch_dsl requests
You will see a ton of standard output, with successful install messages for the following packages (your packages may vary).
…
Adding boto 2.38.0 to easy-install.pth file
…
Adding Flask 0.10.1 to easy-install.pth file
…
Adding itsdangerous 0.24 to easy-install.pth file
…
Adding Jinja2 2.8 to easy-install.pth file
…
Adding Werkzeug 0.11.3 to easy-install.pth file
…
Adding MarkupSafe 0.23 to easy-install.pth file
…
Adding DateTime 4.0.1 to easy-install.pth file
…
Adding pytz 2015.7 to easy-install.pth file
…
Adding zope.interface 4.1.3 to easy-install.pth file
…
Adding WTForms 2.1 to easy-install.pth file
…
Adding Flask-WTF 0.12 to easy-install.pth file
…
Adding elasticsearch-dsl 0.0.9 to easy-install.pth file
…
Adding elasticsearch 2.2.0 to easy-install.pth file
...
Adding python-dateutil 2.4.2 to easy-install.pth file
…
Adding six 1.10.0 to easy-install.pth file
…
Adding urllib3 1.14 to easy-install.pth file
Note: You may see errors such as: ">“An optional code optimization (C extension) could not be compiled. Optimizations for this package will not be available!” or “WARNING: The C extension could not be compiled, speedups are not enabled.” If these errors concern you, then you can install the python development package. Nonetheless, run pip freeze again to see the newly installed packages (NOTE: These only exist in your virtual environment.)
(flask_to_es)ubuntu@ip-172-31-35-80:~/flask_to_es$ pip freeze
DateTime==4.0.1
Flask==0.10.1
Flask-WTF==0.12
Jinja2==2.8
MarkupSafe==0.23
WTForms==2.1
Werkzeug==0.11.3
boto==2.38.0
argparse==1.2.1
elasticsearch==2.2.0
elasticsearch-dsl==0.0.9
itsdangerous==0.24
python-dateutil==2.4.2
pytz==2015.7
six==1.10.0
urllib3==1.14
wsgiref==0.1.2
zope.interface==4.1.3
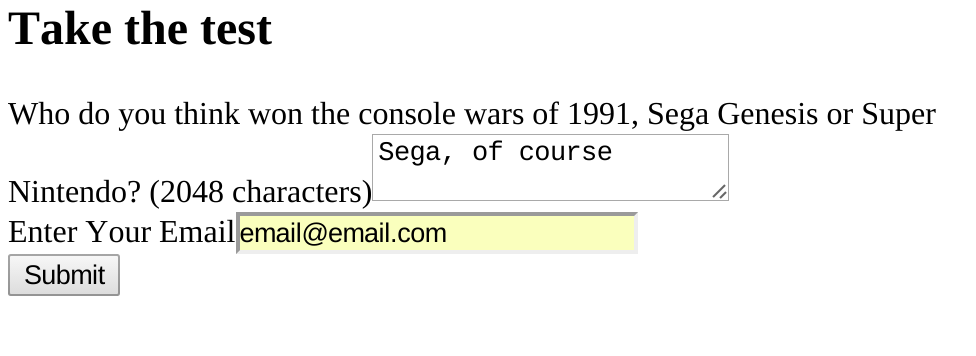
We now need to create our model. For this test, we will have the quiz taker answer a thought-provoking, timely, provocative, serious and relevant essay question about video games from over 25 years ago.
They will answer the essay and enter their email address. Behind the scenes we will record their IP address and timestamp their answer. We want to store this data in an Elasticsearch index. Elasticsearch will “analyze” the essays so we can search amongst them, but Elasticsearch will not analyze the IP address or email address. We do not want Elasticsearch to break down the IP address by Octet nor break down the email address by user, domain and TLD. We also don’t need to parse the timestamp by colons.
For the form model, we do not want the end user to be able to edit their IP address, timestamp or choose if they are spam or not. We limit, therefore, the form to just the essay question (with plenty of space to write a decent “thought-piece”) and their email address. For the email address we ensure that they enter at least a syntactically valid email address.
Edit models.py:
You just created a data model for both your Elasticsearch quiz document and your form object. Well played. We now need to configure the web server itself.
Even though this our first stab at Flask I decided to separate out (“separate out,” is that proper grammar?) the config file. Let’s create one here, so we have a token to prevent Cross Site Request Forgery (CSRF) attacks. Be sure to create your own 32 character string.
Once you have a unique 32 character string, vim config.py.
I also want to take a moment to remind you how great we are, just in case you forgot. Since we use IAM roles, we do not need to hard code any AWS_ACCESS_KEY or AWS_PRIVATE_KEY into this config file. Feel free to laugh at the posers that add those lines to their N00B flask scripts and then point them to HOWTO-1.
Also, feel free to introduce the term “poser” back into the lexicon.
I really love Flask. At the top of our application we will import all the necessary libraries and connect to our AWS provided Elasticsearch service index and finally set up the “if/ then” (or “route”) logic. If the client goes to the home page, then we route them to the web form. If they submit the form, then we parse the data, validate it and send it to our big_survey Elasticsearch index.
The “Flask way” uses templates for the view (I know, I know, they use “templates” for the “templates.”). We call templates in our application.py code in order to render the view for our Internet facing form. You will find the entire script immediately follows this paragraph and then I describe it section by section.
Edit application.py:
Step 1:
Import the libraries, including your models from models.py and your configurations from config.py.
from boto.connection import AWSAuthConnection
from flask import Flask, render_template, request, redirect, url_for, flash
from models import Quiz, QuizForm
from datetime import datetime
from config import DevConfig
import json

application = Flask(__name__)
application.config.from_object(DevConfig)
Step 2:
Connect to our AWS provided Elasticsearch service (Make sure you put the address of your Elasticsearch URL).
Notice that we take a few additional steps beyond our original demo.
If you’re the jargon type we use a decorator to set a global for the connection, in order to make life easy for us when we deploy to ElasticBeanstalk in HOWTO-4.
class ESConnection(AWSAuthConnection):
    def __init__(self, region, **kwargs):
        super(ESConnection, self).__init__(**kwargs)
        self._set_auth_region_name(region)
        self._set_auth_service_name("es")
    def _required_auth_capability(self):
        return ['hmac-v4']

@application.before_first_request
def make_connect():
    global client
        # Note, BOTO receives credentials from the EC2 instance's IAM Role
    client = ESConnection(
      region='us-east-1',
      # Be sure to enter the URL of YOUR Elasticsearch Service!!!
      host='search-test-domain-ircp547akjoolsbp4ehu2a56u4.us-east-1.es.amazonaws.com',
      is_secure=False)
Step 3: Create a route.
We can create “if/ then” logic for the same page address. If somebody wants to GET the page, we assume that they did not fill out the form, because if they did, they would POST it. Since they did not fill out the form, we give them the form. If, however, they POST the page, we first make sure that they POST valid data. If they did not POST valid data, we give them a blank form. If they did POST valid data, we yank the data out of the FORM object and chuck it to our ElasticSeacrch DSL object. In addition, we pull their IP address, timestamp and for now trust them as not spam.
In HOWTO-5 we bolt on calls to a public Spam filtering API to verify this, but for now we let them through.
@application.route('/', methods=['GET', 'POST'])
def take_test():
    form = QuizForm(request.form)
    if not form.validate_on_submit():
        return render_template('take_quiz_template.html', form=form)
    if request.method == 'POST':
        completed_quiz = Quiz(tags=['v0.1'])
        completed_quiz.essay_question = request.form.get('essay_question')
        completed_quiz.email_addr = request.form.get('email_addr')
        completed_quiz.iso_timestamp = datetime.now().isoformat()
        completed_quiz.client_ip_addr = request.remote_addr
        completed_quiz.is_spam = False
        esdata = completed_quiz.to_dict()
        resp = client.make_request(method='POST', path='/big_survey/quiz',data=json.dumps(esdata))
        dict_resp = json.loads(resp.read())
        return 'Posted!'
Step 4: Initialize the service.
if __name__ == '__main__':
    application.run(host='0.0.0.0')
Step 5: Create templates/take_quiz_template.html
<h2>Take the test</h2>
        <form role="form" method="post">
                {{ form.csrf_token }}
        <div class="textarea" >
                {{ form.essay_question.label }}{{ form.essay_question}}
        </div>
        <div class="text" >
                {{ form.email_addr.label }}{{ form.email_addr }}
        </div>
        {{ form.submit }}
        </form>
Now we need to punch a hole in our firewall so we can test our beautiful web page.
Go to your AWS management console. Then click on your policy, incoming. Add HTTP from my IP and also custom TCP rule, 5000 from my IP. (If you are so inclined, you can add an NGINX proxy in front of your flask application). Once you this start your application on the shell via 'python application.py.'
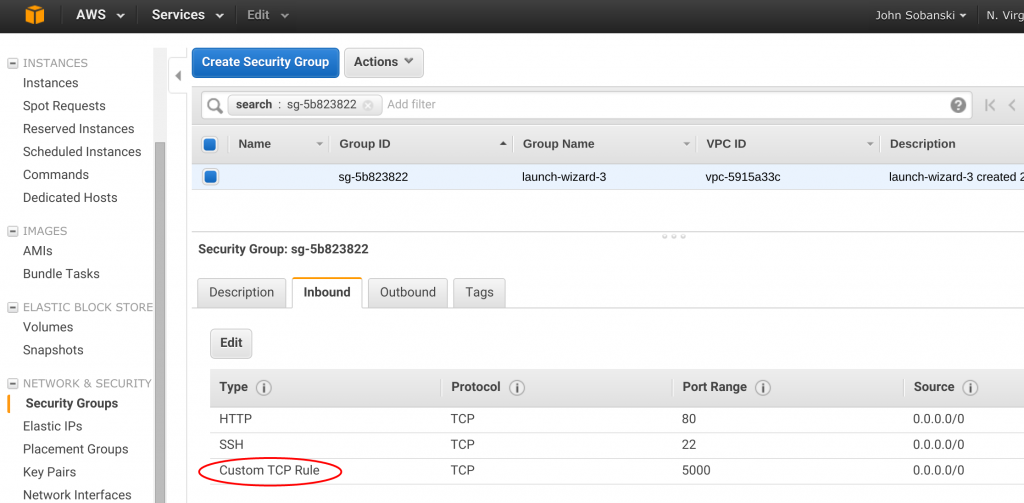
Now, drumroll please, go to your Public IP from a browser (add :5000 to the end if you did not opt to add an NGINX proxy) and fill out your form.
Click submit and…
Yay! (Nothing big happened, I know).
Go back to your shell and you will see a 200 message.
(flask_to_es)ubuntu@ip-172-31-35-80:~/flask_to_es$ vim application.py
(flask_to_es)ubuntu@ip-172-31-35-80:~/flask_to_es$ python application.py
 * Running on http://0.0.0.0:5000/ (Press CTRL+C to quit)
 * Restarting with stat
 * Debugger is active!
 * Debugger pin code: 681-900-431
 192.168.0.13 - - [16/Jan/2016 18:53:04] "GET / HTTP/1.1" 200 -
We are almost done with this extra-long HOWTO. Control C out of the Flask service and copy the script from Lab one to our local virtual environment.
ubuntu@ip-172-31-35-80:~$cp ../connect_to_es/connect_to_es.py .
We will now edit the script to pull the record from Elasticsearch. I will plug again the fact that our IAM role (along with boto) obviates the need for hard coding credentials. Please feel free to punch me in the face if this tires you.
Now run the script and:
{"took":318,"timed_out":false,"_shards":{"total":5,"successful":5,"failed":0},"hits":{"total":1,"max_score":1.0,"hits":[{"_index":"big_survey","_type":"quiz","_id":"AVJL1qg4guXAmqyaEnW_","_score":1.0,"_source":{"tags": ["v0.1"], "email_addr": "email@email.com", "client_ip_addr": "192.168.0.13", "iso_timestamp": "2016-01-16T19:08:38.993547", "essay_question": "Sega, of course", "is_spam": false}}]}}
Ta Daa!!!!
In the next HOWTO we will use Bootstrap to trivialize our template and trivialize validation. We will also use Bootstrap to get us some fancy validation errors. I will say Bootstrap one more time and then end this HOWTO.